Today, we will guide you, as our beloved readers to make an origami envelope easy. Let’s follow these instructions!
Things You Need
Origami paper
Ruler (optional)
The Steps
- Prepare a rectangular paper and position the corner facing you. If you want colored envelopes, the colored paper corners must be below.
- Fold the paper in half, from corner to corner, splitting the rectangle.
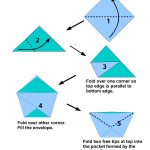
- Take the top corner on the first layer of paper and fold it to the bottom end.
- Fold the right corner of the third part to the left. It doesn’t need to be perfect, but try to be as accurate as possible.
- Take the left corner and fold it to the other end. Now the bottom will be square.
- Fold the corner of the flap that piles on top of the other flap to the left end.
- Fold the tip of the flap upwards, which is to the upper-middle corner. Open the fold. The fold line formed is a guide for the next step.
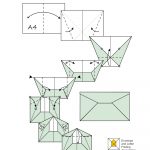
- Rotate the origami paper 180 degrees. Now, the point of view will be reversed.
- Open the tip of the folded flap.
- Make a fold to form a rhombus at the end of the flap. Flatten well because this section will lock the envelope to keep it closed.
- Turn the envelope back to its starting position so that it is perpendicular. Or turn it 180 degrees.
- Fold the top flap to the bottom end. Or to the square base of the envelope.
- Insert the top flap (the part you just folded down) into the rhombic “pocket” that you just made.
- Flatten the paper. Make sure the envelope fold is not open.
Well, you can follow the instructions of this origami envelope easy.