How to origami step by step? Are you ready to play origami? Don’t want to be outdone by kindergarten children. If you also want to make it, here I share my experience. You can practice it later with your children. Of course, this is very fun, right? Well, I will explain how to make origami of shirt.
The Material Needed
In this shirt origami, you need:
- Origami paper size 160×160 mm, patterned or plain.
- Scissors or cutter to cut.
How to Make It?
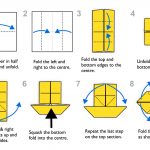
- Prepare a piece of origami paper measuring 160 x 160 mm.
- Fold the paper in half to form a vertical help-line. Next, cut the paper right on the horizontal line using scissors or cutter because only half of the parts used are used to produce a rectangular shape.
- Turn the paper over, which is colored under the white one above. Next, fold a little center to look for verbs and diagonal helplines by pinching or using a pencil to mark.
- Fold the paper in half to meet the horizontal center line.
- Fold the right side to the vertical center line.
- Do the same for the other side.
- Open the fold and fold in a row to the right with the fold line up to the middle horizontal line. Likewise, on the other side, unfold and fold to the left with a fold line to the middle horizontal line. This is to form the arm.
- Then fold the top side. Fold slightly towards the back.
- Make the collar shape by folding the upper right corner into the vertical center line.
- Likewise in the upper left corner of the fold, it folds to the vertical line.
- Fold the bottom up until it is just below the collar. Slip right under the collar to make it neat. Yeah, finish!


So, the way to make an origami shirt dress is very easy. Do you still ask how to origami step by step?